This is a photo-blog of the neglect TDC has given to some areas of it's housing. This same neglect has been going on for 5 years.
How to prepare a painted door for painting (DIY 101)
"Failing to rub smooth a poor surface or using a low-grade brush with an inadequate amount of bristles are basic faults. Wash surfaces thoroughly, rub down, then wipe with a lint-free cloth dampened with white spirit."
-- DIY.COM
In light of the poor job done on my front door by the council workers I have taken upon myself to research in sufficient detail as to be able to show how the job should be done. It is my hope that this introductory guide should be sufficient for other council tenants to identify a cowboy job quickly and simply.
DIY.COM Rate this as a novice friendly task and Dulux also have a guide
Your door: as we are dealing with doors that have been painted already and are being re-painted I shall not address the issues of preparing new wood for paint.
Preparation
-- DIY FIX IT
- Providing that the old paintwork is in sound condition, there is no need to remove it. It can actually form a very good base for new paint.
- If there are lots of defects in the paint - chips, lumps and bumps, badly painted or beginning to flake, craze or blister - it should be stripped.
- Sound paintwork should be washed with sugar soap and rubbed down to provide a smooth surface ready to receive the new paint.
Sanding Down
"For best results, all surfaces need to be thoroughly sanded. This will provide a key for the new paint as well as enhancing the appearance. With old paintwork bear in mind that it may contain lead. If in doubt use the wet technique to avoid generating lead dust. Simple kits are available to test for lead content."
-- DIY FIX IT
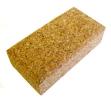

When sanding doors (unless they are particularly ornate) you should always wrap the sanding paper around something called "a sanding block" which is usually made of cork. The block ensures that the paper is flat and properly pressed in contact with the door at all times.
As well as ensuring an even job using a sanding block will also stop you hurting your hand and doing damage to your knuckles.
If the current layer is particularly uneven, flaky or has deep "dents" or gouges then it may be necessary to strip the paintwork pack somewhat. There are two way that this can be done but the simplest method is to apply some elbow grease with a handheld electric sander. These devices, which can often be hired for the day for very little, will enable you to smooth your door and prepare it for the primer coat.
you will need to ensure that you move the sander evenly over the entire door to avoid creating a concave service area.
Before you use the sander be sure to use a scraper to remove all the loose paint work remembering throughout to where the correct protective gear.
If your door has a particularly bad indentation then it may not be possible to reduce this with a sander instead you will need to apply a filler. You local DIY store will be able to advise you further.
Once you have sanded and prepared the door it is vital that you remove the dust from your working environment and ensure that it does not contaminate your paint.
"Make certain that corners are cleaned out by tying a lint-free cloth around a pointed stick, dampening it with white spirit and cleaning out the corner thoroughly"
-- B&Q / DIY.COM Howto PDF
If you property was built before 1960 there is a good chance that it contains paint lead based paints. In these cases it would be wise to hire a professional.
Primer
When changing between markedly different colours you will save yourself a lot of heart ache by applying the correct undercoat. A good choice of undercoat or primer can save as many as six additional coats of top coat. You local DIY store will be able to advise you on a good choice of primer at the same time that you purchase you chosen colour.
The primer should be applied in the same manner as the gloss coat evenly and not too thickly. Once it has dried it will provide good foundation on which to paint your top coat of paint. The primer will only be as good as the preparation and sanding that has gone before.
Modern primer often require no additional "keying" (a quick going over with sand paper) before painting although any runs will need to be removed and smoothed before painting the top coat.
The Painting (The Top Coat)
"If the paint is applied too thickly or is not brushed out enough, then runs and wrinkles will result. A common cause is trying to paint around fittings such as door handles. Apart from the likelihood of smudging paint onto the fitting, it is far better to remove all fittings before painting."
-- B&Q / DIY.COM Howto PDF
Generally you will purchase more than one tin of paint. To avoid slight but telling colour variation it is advisable to mix the two almost identical tins together in a larger pot.
Make sure you use a good quality brush. You may have to pay a little more but a cheap brush is likely only to shed bristles and not hold the paint well making it more difficult to create an even finish.
Hold the brush firmly near the base of the handle and brush swiftly in an single set of directions - most decorators recommend up and down. A good stead action will soon see the door painted well.
A common mistake made by people new to painting doors is to worry about the gloss drying and to try to finish too quickly this generally leads to too much paint being applied to the brush which results in runs, creases and drips all of which waste both time and paint needlessly.
Notes on durability and other considerations
The most durable paint for doors is without question Oil Based Gloss with is particularly tough and has a nice shine to it. However oil based paints give off fumes which can prove hazardous in unventilated areas especially around pregnant women and small children.
The alternative to oil based gloss is water based gloss which is a little less forgiving of brush marks so a good brush becomes vital. It is also less tough but still sufficiently resilient for an interior door. You can often manage two coats of water based in a single day as it drys much faster than oil based.
For external doors the oil based is probably your only choice but care should be taken to keep the area free from pets and children and to limit the propagation of fumes around the home. Once it has dried it should be virtually impossible to cause a well glossed door to chip or flake paint for many years with some manufacturers promising a ten year minimum life span.
Identifying a cowboy job.
A cowboy job is identified by a number of symptoms many of which are hidden and will only reveal themselves if you watch the worker or wait for the work to "fall apart", fade and generally decay.
It should be noted that if you paid someone you believed to be a professional for the job you have a right to expect to be satisfied with the result or have them do it again at their own cost.
"It is so often said that preparation is the key to a good job, and it really is the case. The difference between a good and bad job almost invariably relates to the amount of time spent preparing the work."-- DIY FIX IT
Read the list below. Award the job one point for each point it fails on.
- Little or no preparation time
- Little or no care or consideration is made for the protection of others from the potential harmful effects of lead-paint dust, general dust and fumes.
- The worker dry sands or attempts to dry sand paintwork identified as containing lead.
- Worker failed to prime the paintwork or did so in a lacklustre fashion
- "Lumpy" finish (one extra point per lump or square inch thereof)
- After reading this article you feel the worker needs re-educating and possibly you could do better
- Paint marks on carpet, walls, furniture, household items, etc (also consider consulting a solicitor)
- Brush hairs, dust, dirt, finger prints etc in paint work. (two points for each)
- Worker demands money or other payment to acquire materials
- You find yourself charged for brushes, dust sheets, rest breaks, time off-site etc (add twenty points and call your local trading standards office)
- Paint starts to flake, peel and chip within days or weeks of the jobs completion.
- This PDF document (Adobe reader required) lists 11 common problems (generally caused by basic amateur mistakes) and how to avoid and/or cure them. Give the job two points for each point it fails.
- uneven finish (add additional points for each place you can still see the layer beneath)
- Brush marks remaining after the paint is dry (add additional points for severity)
- Worker demands resources such as access to a sink to wash brushes. A pro would have these resources with him so award two points.
- Worker stops work for a break before completing the door (you should be able to see the join where they started again so award one point per inch of bad join)
- Drips and runs in the paint work. Add additional points if this is somewhat excessive.
A score of 3+ indicates definite cause for complaint
A score of 10+ confirms the worker as an outright cowboy
This has been a documentation of the impact of Thanet District Council (TDC)
contracting and sub-contracting standards.
posted by Matt the Hat at 4/19/2005 01:13:00 pm
0 comments